Email list hosting service & mailing list manager

Segmenting your email lists

Posted on Jul 17, 2018


If you’re using Simplelists for email marketing, you should be aware that segmenting your email list is one of the best ways to boost the effectiveness of any email marketing campaigns that you run. This is because you can ensure that the email suits your client’s specific interest(s) and increase the likelihood that they open your email and respond to your call to action.

If you are using Simplelists for private groups discussions, you may already be pretty familiar with the segments of your list. If it’s something you want to think about some more, or run a specific marketing campaign, here are four tips for email segmentation to help you get the results you want.

Email list segmentation

1. Split your list into groups that are alike

Your email recipients aren’t all alike and there are very likely to be groups (or segments) that exist in your list. Are there age groups that might respond differently to your call to action, or are there particular interests that you could focus on? Each group will need its own email stream with content that suits the reader. Common groups tend to fall under four headings:

  • geography (location, language, climate, etc.);
  • demography (age, gender, income, etc.);
  • psychology (lifestyle, opinions, values, etc.); and
  • behaviour (purchase usage, buyer stage, user status, etc.).
2. Recognise that there are stages at which people interact with you

Your list members will require different information, depending on how long they have interacted with your business/activity. For example, someone who has visited your website once and subscribed to your email list will need different information to a long-term customer who is very familiar with your products and/or activities.

3. Build credibility

Segmenting and personalising your emails shows the recipient that you are interested in more than just selling to them. Instead, you take the time to get to know them as well as looking into their needs and interests.

4. Go beyond the obvious

You don’t need to think only about people’s interests now and what other groups they fit into at this time. You could have a think about what they might aspire to them in the future with regards and goods or services that might appeal to them. You could also think about using 'negative data’ i.e. if they prefer one brand, they might be likely to be disinterested in another.

Tags:

Branding the landing - top tips

Posted on Apr 29, 2018

When you contact the members of your email list, it is likely that your message will include a link to a page on a website designed specifically for them to read more, subscribe and/or visit email archives - this is called a 'landing page’ and these can be generated automatically using Simplelists. So that the page that they land on looks correct and does what you need, you may want to make sure that your list members see your branding or logo when they click through. In this post, we explain how to customise your landing page and share some other top tips for making the landing page 'perfect’.

branding your landing page

Use your own logo or branding

To replace the Simplelists branding with another image, copy the web address of the image that you would like to use instead. When logged in to Simplelists, navigate to the 'General Settings’ menu and paste the web address of your image into the custom image field. Click 'Update Settings’ and you should see the message 'The settings have been updated successfully’. Refresh/reload the page and you should then see your own branding. You can also watch these instructions in a short video.

Top tips for marketing landing pages

If you are running an email marketing campaign, have a think about what you want to get from your landing page when your members visit it. For example, do you want to persuade the visitor to click on another page (click through), buy a product, or gather data from them (lead generation)?

Don’t link to your home page

A good landing page will generally be a separate page that is distinct from your website (i.e. not just to the home page) and it will tend to have no navigation menu and be accessible only from the link in the email.

Use a snappy, concise headline

The title of the page will be the first thing that visitors read so make sure that it is near the top of the page and large enough to be obvious. Make sure the title is relevant to the content of the email they have come from.

Use an image or video

An image or short video is a great way to make an immediate good impression and also entices people to read what follows. Put the image/video near the top so that people don’t have to scroll to see it.

Check your colour scheme

Different colours generate different emotions and feelings when people see them. Try to match the colours in your image/video to what you are doing. Blues tend to be associated with trust and stability, while red emulates energy, strength and passion.

Break up your text

It is a good idea to use sub-headings to break up the text on your page. This makes it much easier for people to read and directs them quickly to the topics of most relevance to them.

Make the call-to-action obvious

Whatever you hope that your visitors might do (subscribe, buy a product, click through, etc.), make it clear and easy for them to do so.

Make sure mobile users have a good experience

Finally, don’t forget that the majority of visitors may well be using a mobile device. So, make sure the landing page can be viewed well on a range of devices. If it is not an option to make the page responsive, at least make sure it works OK on phones and tablets. This is definitely important if you want your visitors to fill in a form or make a purchase.

Tags:

How to search your email archives

Posted on Apr 4, 2018

Simplelists keeps a record of all of the emails that have been sent to your list. This archive can be useful for new list members who might need to quickly get to grips with topics that have already been covered in a private group discussion. It is also a great tool for keeping a back up of all of your communications. If you haven’t already, you can learn how to set up, view and personalise the archive in a recent post on our blog. Below, we explain how to search your email archive, allowing you to find old emails using a keyword search.

Archive search

Finding the right message in a busy list

Busy lists that have existed for a long time can accumulate thousands of emails over many years. When new members join a list, they can be granted permission to read emails that were sent before they joined, and access old emails about a specific subject. To do this, the Simplelists email archive has a keyword search function that allows you to look for old emails by keyword. You can also browse all messages by date or by thread.

Accessing the archive

You can find the archive search function from the Members Home page once you have logged in to your Simplelists account. Under 'What would you like to do?’, click on 'View list archives’. If your list manager has set up a password for accessing the archive, you will need to enter this. Otherwise, you can request an access code by entering your email address.

Once in the mail archive, messages are grouped by month and year, with the search box at the top. Type in your keyword and the relevant emails will be displayed. On this page, you can also view list statistics and read more information about your list.

Search tips

We all know how to use a search box but these tips might come in useful if you’re not entirely sure of the best keyword to search for:

Wildcard ‘?’ - Type the ? symbol and it will be replaced with any single character. This is handy when you’re not sure how a word should be spelt. For example, you might be looking for an old email titled ‘Worthington Event’ but you had forgotten if ‘Worthington’ was spelled with an ‘o’ or a ‘i’ you can type ‘W?rthington’ and the results will show emails with both spellings.

Wildcard ‘*’ - Type the * symbol and it will be replaced with any number of characters. Using the previous example, if you weren’t at all sure how to spell ‘Worthington’ you could type ‘W*ton’. The search results will show all emails that start with a ‘w’ and end with the letters ‘ton’, including ‘Worthington’.

You can also search by keyword for specific months. Browse to the month of the email that you are looking for and then search while in that month. The search will geneate results only for that month.

Tags:

Sending HTML emails with Simplelists

Posted on Dec 29, 2017

HTML emails are formatted like a web page and can include colours, graphics, tables and links. Most emails that you receive from a shop/business that you subscribe to are likely to use this kind of email. Plain text emails are more like what you might expect to receive from a friend or in a typical work email. Before sending an HTML email to your list, it is worth considering the pros and cons of HTML and plain text emails.

HTML email

HTML or plain text?

HTML emails are colourful and eye-catching. You can include your company logo and make your email look professional. HTML emails can include images and make it possible to break the email into sections that are easy to read or scan. They can also include social media buttons. HTML emails are more likely to be blocked by some spam blockers, especially if they contain a lot of HTML.

Plain text emails are small and light, which means they use less memory and open more quickly. Plain text messages look less commercial and more similar to personal emails. It has also been found that a plain text email is more likely to be opened and clicked through, which is important if you are sending emails as part of a marketing campaign.

Creating an HTML email

First, you need to create your email as a single web page. There are a few special points to note when creating HTML for email:

  • Use tables to create the layout. Avoid using margins and padding and give the table’s elements fixed widths. This prevents the email looking different in different email clients.
  • All CSS styles should be inline styles. Any CSS in the head or on external style sheets will be ignored.
  • Any images should have an absolute URL - they’ll need to be on the server so they can be sourced.
Once complete, view your web page in a browser. First, check that the page looks perfect. Right click and select all and then copy. Note that you should not copy the HTML code. Copy the content of the web page.

Send the email

Open your email client and compose a new message to your list. Simply paste the email and hit send. Your HTML email will be sent to your whole list. Simple.

You can watch these instructions in a short video here.

Tags:

Add list members from a spreadsheet

Posted on Nov 27, 2017

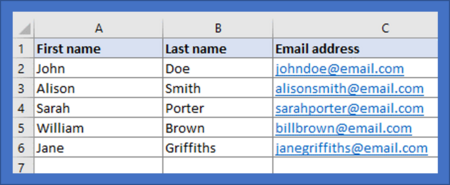
When you start to build an email list you may only have a few members. If this is the case, inputting people’s details manually via the Simplelists members area is straightforward. When your list starts to grow, you may find it helpful to add a large number of subscribers at one time, from a spreadsheet. It is also useful to have a spreadsheet copy of all your list members for your own records. In this short post, we explain how to add members to your list from a spreadsheet.

Add list members from spreadsheet

Prepare the spreadsheet

First, open your spreadsheet. Your spreadsheet only needs three columns:

  • First name
  • Last name
  • Email address
If a name is missing, don’t worry as it can be left blank. You can also add notes in another column.

Remove any headers and titles from the spreadsheet (you may need to delete a row to do this). Your list is now ready to go.

Save as a .csv file

Save the file as a .csv file type using the 'Save As’ dialog box in your spreadsheet program. You may be asked if you are that you wish to save as a .csv file. Just select 'OK’ or 'Yes’ when asked. Remember where you save your file.

Upload to Simplelists

Finally, you want to upload the file to Simplelists. Log in to Simplelists and select the 'List members’ page. Click on the 'Upload file’ tab and search for the file that you saved earlier. Make sure that 'comma separated’ is chosen in the drop-down menu on the 'Upload file’ page in Simplelists. Then, click 'Next’.

On the next screen (’Select fields’), select the correct field name for each column of the file (First name, Last name, Email address, etc.). Then, click 'Next’.

The next screen will show you some 'Upload options’ which you can choose to select or not:
  1. By default an entry’s name will be updated when the email address matches an entry already in your address book. If you would also like to update the email address if the full name matches then please check this box.
  2. Send confirmation requests to all addresses uploaded (except those already in the address book and already confirmed).
  3. Delete current address book entries that are not in uploaded file.
When you have selected any options you wish to activate, click 'Finish’. The new members will now be added to your list. You can check that they have been added by viewing your address book from the 'Members home’ page.

You can also watch a short video of these instructions in an earlier post on our blog.

Tags:

Add a subscribe form to your website

Posted on Oct 22, 2017

Having a form on your website that allows people to sign up to an email list is a great way to grow your email list and increase the potential for your messages to be shared beyond your list members. In this short post, we explain what a subscribe form is, how it can work for growing your list, and how to use Simplelists to create a form for your site.

Add a subscribe form to your website

What is a subscribe form?

A subscribe form (sign-up form, email opt-in form) is an embedded/hosted web form that you can put on your website, blog or social media pages so that people can enter their details into the form to sign up to your list/email group. Normally, the form is very straightforward and only has a few fields to get the information needed. Name and email address are most important.

Importantly, this is a way to collect email addresses with permission. The person completing the form is actively agreeing that you can send him or her emails sent to your list. This is good news in terms of abiding by rules related to spam, as well as hopefully resulting in more visits to your website and/or participation in group discussions via clicks from your emails.

Creating a form using Simplelists

First, you need to copy the code from Simplelists. Sign into Simplelists and navigate to 'general settings’ and then the 'subscriptions’ tab. Scroll down to 'web subscriptions’, select the code and copy it. Next, you need to paste the code into your website. Open your website editor and paste the code where you want to the form to appear. This should be somewhere between the <body> and </body> tags. In this short video, you can see the code pasted into a div created for this purpose.

Styling your form

Finally, you can style your form by using CSS to change how your form looks. This means that you can make it match perfectly with the design of your website. You can also edit the HTML to adjust your form. For example, you could add a title above the form or remove some of the form options, to simplify it. You might like to remove the daily digest summary option, the unsubscribe option and/or the notes box. If you remove these three lines of code, you would be left with a form that allows users to leave just their name and email address.

It is a good idea to put your form in a visible place on your site where you receive the most visitors. Examples include: the top side bar of your website/blog, the top navigation bar, the footer, on your 'About’ page, etc.

That’s all there is to adding a subscribe form to your website - simple.

Tags:

Setting email posting permissions

Posted on Oct 3, 2017

Simplelists is designed to be flexible so that it will suit your needs exactly. You might want to send email newsletters to a list of customers with you alone being able to post to the list. Or, maybe you have a team of people who will all need to be able to send emails to your customers. Or, perhaps you would like to use your list for a private group discussion and you would like anyone on the list to be able to contribute. Whatever your needs, you can customise your list by setting posting permissions. In this short post, we explain how you do this.

Posting restrictions

Login and navigate 'list settings’ in the left hand menu. Under the 'Posting restrictions’ tab you will see the heading 'posting permissions’ with three radio buttons next to it:
  • Allow anyone to send messages
  • Hold all messages for approval
  • Choose specific people who can send messages
If you select 'Allow anyone to send messages’, this permits both members and non-members to send messages to your list without approval being necessary. As an alternative, you can choose to 'Hold all messages for approval’. Or, select 'Choose specific people who can send messages’ to grant specific people permission to send messages to the list. With this third option, you can select all list members or provide the individual email addresses of those permitted to send messages to the list. Just enter their addresses in the box that appears when you select this option. This setting is useful for private group discussions as you can choose to have only specific people post to the list. This setting is also useful for email marketing and newsletters.

Email replies

When thinking about permissions, you may wish to consider where email replies are sent. Select the 'Email customisation’ tab and, under the heading 'List replies’, choose whether the reply is sent to the person who sent the original message (select 'Replies go to poster of message’) or to the whole list (select 'Replies go to list email addresses’). In this section you also have the option to strip attachments from the messages that are sent, truncate long messages to a set character limit, and add a message footer to be attached to all emails sent.

You can watch these instructions in a short video in a previous post on our blog.

Tags:

Say no to 'no-reply' email addresses

Posted on Apr 21, 2017

It is becoming more widely accepted that 'no-reply’ email addresses can be harmful to an email campaign. The 'no-reply’ email address effectively stops, or tries to put people off from, replying to your emails. While this may help to ensure that your inbox doesn’t become cluttered, it gives a negative message to readers - in effect, you don’t want to hear back from them. This probably isn’t good for business. If you still use 'no-reply’ email addresses in your business/email marketing communications, this post contains some reasons why you might want to stop.

 No reply email

Email deliverability will be affected

Many email services and Internet Service Providers (ISPs) detect the response of an email’s recipient to gauge whether the email is legitimate or not. Whether a recipient opens, clicks, replies, unsubscribes, forwards or deletes the message determines whether the message is considered as 'good’ or as 'spam’. Gmail, for example, ranks the importance of an email based on the recipient’s action - if the recipient replies, Gmail is more likely to class the email as 'important’. If your recipient can’t reply, your emails are likely to end up in the Spam/Junk folders (read more about keeping your emails out of spam in an earlier post).

Some people also don’t look for the (sometimes very small) unsubscribe link, instead hitting 'reply’ to request they be unsubscribed from the mailing list. If they then learn that replying is not possible (either because the reply email starts with 'no-reply’ or similar, or their email is returned undelivered), they are then likely to click 'report spam’. You can read more about spam management and delivery rates in one of our other posts.

Missed chance to be added to contact lists

One way to ensure that your email reaches the recipient’s inbox is if your email address has been added to their contact list (this means it has been 'whitelisted’). Most ISPs do not allow users to add 'no-reply’ emails to their address books. If they are unable to reply to your emails, they are also unlikely to add you manually. Email providers like Gmail and Yahoo automatically add an email address to a contact list if the user sends a message to it so it makes sense that recipients should be able to respond.

Reduced conversion rate

In the age of social media and online identities/persona, receiving communications from a 'machine/robot’ means that the sender of an email has no personal touch. People probably still like to feel that there is a real person sending the email to them! With a 'no-reply’ email, it is much less likely that the recipient will take action on what is in the email. Using an address like 'customer-services’ or a real name is likely to be much more effective when encouraging customers to respond to a call to action. Similarly, make sure the name that appears in the recipient’s inbox shows your brand clearly (e.g. 'Simplelists Account Verification’ rather than just 'Account Verification’).

Makes it harder to keep your email list up to date

Some people also hit 'reply’ to update their details with you. A real email address will allow you to find valuable information in the replies that will ensure that your contact list is kept up-to-date. Excluding incorrect email addresses from your mailing list will also help your deliverability rates and prevent your messages from being sent to spam.

Tags:

Customising your landing pages

Posted on Mar 21, 2017

When you send an email to your list, it is likely that your message will contain a link to a webpage for your members to read more or visit a particular website. It’s important to make sure that the page they click through to (the landing page) looks right and does what you need it to. One important thing, particularly if you are using Simplelists for email marketing campaigns, is to ensure that your readers see your own branding/logo when they click through. In this short post, we tell you how to customise the landing pages that are automatically generated by Simplelists, which your readers will see when subscribing or unsubscribing, or visiting email archives.

customise landing page branding

Customising Simplelists landing pages

Your Simplelists list has several landing pages. These are webpages for members to subscribe and unsubscribe, and for email archives. To make things quick and easy, these landing pages are set up for you automatically - you don’t need to do a thing. But, if you’d like to, you can customise your landing pages to replace the Simplelists branding with your own logo or branding.

Use your own logo or branding

In the image below, you can see a simple subscribe form with the Simplelists branding. To replace this with another image, copy the web address of the image that you would like to use. Then, log into Simplelists and go to ‘General settings’ in the left hand menu. Paste the web address of the image you wish to use into the custom image field and click ‘Update settings’.

If you have done this correctly, the message ‘The settings have been updated successfully’ will appear at the top of the screen. When you reload the page, you will see the new image, instead of the Simplelists branding.

customise landing page

Other things to think about

If you are using Simplelists for an email marketing campaign, you should give some thought to what you want your landing page to achieve when members visit it. Often, a landing page will be a separate page, distinct from your website (and not just the home page) which is designed for a single purpose. This might be to persuade the list member to visit another page (click through), perhaps to purchase a product, or to capture their data, such as their name and email address (lead generation). A good landing page will often have no ties to your website (e.g. no main navigation menu) and only be accessible from the link in the email.

That’s all there is for now to customising your landing pages. You can also watch these instructions in a short video in a previous post on our blog, or read some tips about how to create the perfect landing page, based on the aims of your email marketing campaign.


Tags:

Designing HTML emails

Posted on Nov 21, 2016

Before delving into writing HTML code for your bespoke design email, it’s a good idea to spend a few minutes doing some planning first. Don’t think of this stage as wasted time - it is more likely to be the opposite - saving you time in the long run as you will know exactly what you are aiming for before starting. A well-planned email is also likely to be a success, especially if you are using the email for marketing purposes.
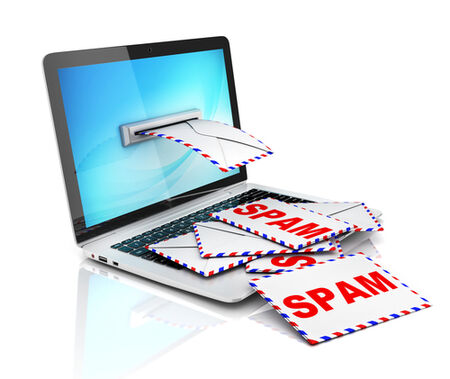
HTML Email Design

Some questions to consider

Before you start writing the code, ask yourself some or all of the following questions:

  • Who will the email be sent to?
  • What is the aim of the email?
  • What is the ideal outcome?
  • What are other positive outcomes?
To answer those questions, let’s think of an example scenario. The email might be going to existing customers of a particular company (let’s call it 'My Company’). The aim of the email could be to share the latest news about an exciting new product. The ideal outcome might be that people reading your email click through to your website and buy the new product. Other positive outcomes might include following the company on social media (Twitter, Facebook, Google+ etc.), or that they remember the company and what it does. At a later date they then may decide to buy the product or look for other similar products, and they may return to the site.

What to include in the email

The answers to the above questions will also help you to decide what you want to include in the email. For the above 'My Company’ scenario, it would be wise to include:

  • A customer name
  • Text with the news and information about the product
  • A strong 'call-to-action’ for the recipient to click through to the company website news page (read more about 'calls-to-action’ in our earlier post on email marketing tips)
  • A logo and social media buttons
Now that you have decided on the content of the email, you can go ahead and sketch a design. You might like to use a pen and paper to do this, or use a simple graphics program that you are familiar with.

Design tips

It is a good idea to use a simple white background for your email - you can choose another colour if you like but white is preferable for ease of reading and a subtle, professional design. When choosing a font, remember that HTML emails are restricted to 'websafe’ fonts so it is quite a simple choice: Georgis, Palatino Linotype, Times New Roman, Arial, Comic Sans, Impact, Lucida Sans Unicode, Tahoma, Trebuchet or Verdana (we don’t recommend using Comic Sans or Impact as they are unlikely to look good and/or be easy to read). Our preference is Trebuchet as it looks modern and is less common that well-used fonts like Arial and Lucida Sans Unicode.

A subtle grey colour works well for text and you might like to choose an 'accent’ colour to go with it. Make sure your text is large enough to read easily. You can use headings anc columns to guide the reader through your text. Keeping a lot of white space in the email is a good idea as it makes the email clean and easy to read. Make sure the 'call-to action’ is very visible. Include a signature, logo and your social media buttons as well.

Step-by-step guide

You can view a short video about designing HTML emails using Simplelists here. This video takes you through the design process step-by-step and is based on the questions we started with in this blog post.

You may also like to browse the short series of six videos about HTML emails that include tips and guidance on: designing emails; writing code for responsive emails; and testing and sending emails.

Tags: